Prepper: 14 Ways Prepping Can Actually Help You Save Money
Continue prepping as we head closer to worldwide martial law and the arrival of Antichrist Maitreya.
Here is the latest from the prepper world.

Prepping can be incredibly expensive depending on how you go about it. Buying a plot of land to build a bug out location on, building an underground bunker, even having a quality prepper stockpile – none of these things are free to do, let alone cheap.
There’s no end to the number of items you could buy that could help you out in an emergency. And while yes, there are cheap, quality items out there, there are also plenty of big-budget items you won’t want to cut costs to buy. High dollar investments that will pay off.
But is prepping worth it financially in the long run? In my opinion, yes, and I also believe that there are plenty of ways preparedness can save you money in the long run, even though in the short-term it may feel like you’re spending a lot of cash to get your preps up and running.
What are these ways?

14 Ways Prepping Can Help You Save Money in the Long Run
1. No convenience fees.
Have everything you need always on you? You’ll never have to go to the convenient store and pay those crazy high convenience prices again.2. Buying in bulk often means cheaper cost per item.
If you’re buying in bulk, chances are good you’re saving yourself money by reducing the amount you’re paying for each individual item. Of course, you’ll have to be sure you actually use what you’re buying or you’d be wasting in that regard, but bulk buying really works if it’s for staples, or things that don’t really expire. Check out a list of the best survival foods to stockpile if you’re interested in going the bulk-buy route for things that won’t end up expiring on you in only a year or two.3. You can take advantage of sales and discounts every time you buy.
Having enough in advance means you can afford to wait until a sale swings around to buy again. This is a huge advantage if there are big 25-75% off discounts regularly in places you shop or would consider shopping at. The less you have to pay at full price, the better.4. You can barter some of the items you’ve stockpiled.
Bartering items you’ve stockpiled at a discount for other items you otherwise would’ve needed to pay full price for is a great way to save money while prepping.Happened to have stockpiled way too much soap for you and your family to use throughout the time span you’d like to use it in? Think you don’t need all that extra? Use swap sites like Freecycle, or regular classified sites like Craigslist or Kijiji to trade the items you have that you no longer want for other items you’re missing and need to get your hands on.
5. Home security preps reduce the likelihood of home robberies.
And we all know how expensive home robberies can be. Spend money on securing your home here and there reduces the likelihood that you’ll be losing what you’ve worked hard to get to thieves and robbers.6. Garden preps can help you reduce grocery store bills.
Obvious – but always true! Growing fruits and veggies in your garden and doing things like canning and jarring can really help you reduce your grocery bills.7. Same goes for keeping chickens and animal husbandry.
The more you have at home, the less you’ll need to buy from a grocery store, and so even keeping chickens for their eggs, or breeding rabbits, both things preppers often strive to do for the sake of being as self-sufficient as possible, can seriously cut the costs of grocery store bills over the years.
8. You can trade home-grown food and meat for other things you may need.
There’s nothing like home-grown fruits and veggies. Have too much for yourself? See if you can trade some of what you’ve got for things your friends & family may no longer want or need, cutting your costs on those items with excess you wouldn’t be using anyway.9. Solar powering your home in part or whole reduces electrical bills.
Yes, solar panels are pretty upfront-cost expensive, and yes, you may not be able to power your entire home on them when there isn’t an emergency. But if there happens to be an emergency, they can at least help you power your freezers and refrigerators, and in the meantime, can help you cut the cost of electricity bills. Win, win if you ask me.10. Rain water collection can help you cut down on water bills.
Using collected rain water to garden with can help you seriously cut down on water bills. Combined with gardening and you’ve got very, very cheap food on your table. And probably better-tasting, too.11. Financial preps save you having to pay high credit card interest when emergencies happen.
If you’ve prepared well enough for financial emergencies that may come your way, you can pay for those emergencies in cash with your savings, and not have to worry about racking up credit card debt and thus expensive interest charges.12. Teaching yourself how to DIY can help you save on minor household repairs.
If you’ve prepped well enough, you should be able to deal with minor household repairs yourself: saving you money.13. Learning other self-sufficiency skills will save you a lot over a lifetime.
Learning how to do things like repair your own car, cook your own food, cut your own hair, sharpen your own knives, and more can really help you save money over a period of years and decades. The more serious you are about prepping, the more of these skills you will be determined to learn, and the less you will spend on others doing them for you.Want to get an idea of the types of self-sufficiency skills that will help you save money over time? Check out these 10, as well as 10 more.
Bartering your skills & prep items can help you save on things
14. Bartering your skills for other items or skills can help you save money you otherwise would have had to spend.
If you’ve learned how to do car repairs, cut hair, sharpen knives, or any other self-sufficiency skills, you can then barter these skills with those who have learned how to do other self-sufficiency skills that you haven’t yet, or you can trade your expertise for physical goods.
Prepping on a Budget?
If you happen to be prepping on a budget, take a look at the following articles for some tips that will help you keep your bank account happy:- How to Stockpile Items for Free or Next to Nothing
- 10 Tips for Building a Stockpile on a Budget
- How to Stockpile Food and Other Goods Cheaply
- Hate Budgeting? How to Build Killer Savings Anyway
Six Ideas for Building a Bug Out Shelter in the Woods

Veteran survivalists innately understand the Rule of Threes. The Rule of Threes is as follows: humans will die after 3 minutes with no air, 3 days without water, or 3 weeks of going without food. At least, those are the most commonly known rules. One that is equally essential and that gets glossed over is the fact that people can die in three hours without shelter that thoroughly protects them of fatalities in harsh conditions.
You may not think the weather in your area is harsh enough to kill you but you might be surprised. During a 1964 race in England, three competitors were cut down by the cold even though it never dropped to freezing temperatures. Even without the threat of imminent death, you can still face abundant health risks if you spend an extended period of time exposed to the elements. You name it, Heat, UV rays, cold, rain, snow, all these and more can quickly shorten your lifespan if you are continually exposed to them without a proper shelter to safeguard yourself.
In this world full of uncertainty, there’s always value in being prepared. Knowing what to do in a survival situation could literally determine life or death. If you know how to create survival shelters in the wild you could survive a situation you would have died in otherwise. That’s why we are sharing our top 6 ideas to creating survival shelters in the wild.
- Lean-To
If possible you should then tie the main pole to the supports to prevent a collapse. From there you simply lean a large number of sticks against the pole to create something that looks like half of a roof. Sticks are essential but they aren’t enough, you’ll need to fill in the open spaces between the sticks with moss, leaves, twigs, and other flora to act as a sort of insulation.
Overall, since the lean-to is open on one side the heat that can be kept in is minimal, the lean-to is mainly for achieving a basic level of protection.
- Quinzhee
- Basic Teepee
- Debris Hut
- Tarp Tent
You can actually make just about any of the structures we’ve listed using a tarp, you simply have to put the tarp on top of the basic support instead of leaves, grass, and other natural types of insulation. Just make sure to secure the tarp with heavy rocks or logs to keep it from being blown away by winds.
- Find Natural Shelter
The average entirely self-built structure might last a night but if you could be stranded for a longer period of time then finding something solid and natural to build around will save you time and effort in the long run. Though at that point, you also need to consider things like access to freshwater and sources of nutrition when choosing where to set up your survival base camp. For your convenience, we put together a List of Emergency Essentials for you to check off. Survival is about planning ahead so life doesn’t catch you off guard.
Related and Recommended:
- Shelters, Shacks, and Shanties: The Classic Guide to Building Wilderness Shelters
- The Complete Survival Shelters Handbook: A Step-by-Step Guide to Building Life-saving Structures for Every Climate and Wilderness Situation
- The Bomb Shelter Builders Book
- The Secure Home
15 Ways To Improve The Soil In Your Garden
Improving the quality of the soil in your garden is both simple and complicated. Simple in that it may require much less work than you would have thought, and complicated because there are so many ways you can do it, but they all require understanding a few underlying principles of nature.All the ways we’ll go over below to create healthy, nutrient-rich soil have three basic objectives: increase bioavailability / absorption of existing nutrients, add any missing nutrients, and increase the efficiency of nutrient cycling (which includes decreasing soil erosion).
1. Mulch and Sheet Mulch
Mulch is not only crucial for weed control, but also for encouraging and protecting the soil and the soil food web of microbes and other allies from the harsh sun, erosive rain, and drying winds, while also providing food for your microbe friends (especially fungi, which will greatly appreciate wood chips, leaves, and other mulch materials).A boost in microorganisms means more predigested nutrients for plants, along with the binding of those nutrients in the soil both within their bodies, and within the well-structured soil they help to create and maintain.
For a supercharged soil building mulching technique, try sheet mulching, which involves smothering weeds and their seeds with a layer of newspaper or cardboard, followed by alternating layers of nitrogen and carbon-rich materials (e.g. compost followed by straw).
2. Plant Diversity
To create more efficient nutrient cycles, plant a diversity of plants with varying root depths and patterns, especially perennials like trees. Perennials have deeper roots that pull nutrients from deeper in the soil profile, while also preventing erosion and nutrient leaching and building soil through their root growth and death cycles. Nitrogen fixing plants are also important to include since they will help to increase soil nitrogen levels (nitrogen being an important macronutrient).3. Chop and Drop
One method of quickly building soil is through chop and drop techniques that involve planting specific trees and other plants that will grow back when cut, so you can cut them over and over again to build soil while encouraging and feeding your microbe friends.4. Green Manures and Cover Crops / Living Mulch / Ground Covers
Cover crops/living mulches/ground covers have the same benefits of regular mulch, but with the added benefit of never having to be reapplied, since they’ll only grow each year, ideally. Meanwhile, green manure, which is simply plants that are planted to then be worked into the soil or cut until they die, will help add nutrients and organic matter to the soil.5. Compost and Vermacompost
Adding compost, and especially vermicompost (worm castings) is a tried and tested method for adding a healthy dose of nutrients, microbes, and organic matter to the soil, all very important for soil health.6. Aerated and Non-Aerated Compost Tea
Compost tea is another way of adding fertilizers and microbes to the soil, in highly bioavailable liquid form. Compost tea not only increases nutrient bioavailability, but also helps prevent and treat diseases by filling ecosystem niches with beneficial microbes that will likely discourage pathogens.7. Effective Microorganisms
Effective Microorganisms are the anaerobic (lacking oxygen) side of the microbe coin, acting in a similar way as compost teas, and they can be ordered online and mixed up at home.8. Mycorrhizal Inoculants
Mycorrhizal fungi are fungi that have a symbiotic relationship with plants, and inoculating your plants during planting has been shown to increase growth and increase the plant’s chances of survival. Mycorrhizal fungi are especially important for trees and shrubs, acting as a highly effective extension of their root systems.9. Nitrogen Fixing Bacterial Inoculants
When planting nitrogen fixing plants, it’s important to find the right bacteria inoculant to make sure you get the most out of the plant’s ability to team with these microbes to transform nitrogen from the atmosphere into bioavailable nitrogen in the root systems of the plants.10. Organic Fertilizers
Some fertilizers, especially concentrated chemical fertilizers like ammonium sulfate or sulfur-coated urea can be damaging to soil ecosystems. Instead, go the steady and slow route and use natural fertilizers like composted manures, seaweed, rock dust, volcanic minerals, and natural gypsum, for example, depending on what nutrients are lacking from your soil.11. Hügelkultur
Hügelkultur is a German technique for building garden beds that involves burying logs and brush in mounds of soil, which dramatically increasing the water holding capacity of the beds while breaking the wood down into rich soil.12. Swales
Swales are specialized ditches dug on contour, and are used in certain climates and with certain soil types to better infiltrate water into the soil while preventing erosive runoff. Trees and other plants can be planted on and around them, making for increased water to the plants and lessening or eliminating the need for irrigation.13. Permanent No Till Gardens
No till techniques ensure that the soil structure is maintained, which in turn helps to maintain the soil’s water holding and nutrient holding capacity, preventing nutrient leaching and erosion. Tilling also causes a disturbance that leads to weed seeds germinating, actually causing more weeds in the long run by exposing the soil’s seed bank.14. Avoid Soil Compaction
Another important consideration is avoiding compaction, which destroys the soil structure and damages the soil food web by limiting water and oxygen penetration, while also making it harder for plant roots to grow and thrive. This is why avoiding heavy machinery is important, especially when the soil is moist (moist soil is easier to compact), and why it’s important to create permanent beds with paths and stepping stones that allow you to access the beds without walking on them.15. Subsoil Plow and Broad Fork
Besides avoiding compaction, you can also reverse and repair existing soil compaction caused by people or machines. On a large scale, one can use a subsoil plow to plow lines on contour (renting a laser level is a good idea for marking contour lines) every 20 feet or so, starting at the highest elevation of the landscape and working down. This will create channels for water and oxygen infiltration, which will in turn boost soil health. On a smaller scale, one can use a broad fork (basically a large garden fork that cuts through the soil) in the garden to break up compaction layers while avoiding the mixing of soil layers (which can damage the soil food web).As you can see from the above tips, the most important way to improve the soil in your garden is to think of your soil as the ecosystem it is and to focus on maximizing the health of that ecosystem, just as nature does on its own in forests, grasslands, marshes and other ecosystems. Instead of simply trying to force feed your soil artificial nutrients, create a healthy soil food web that will break down and make nutrients available to plants as they need them, without disrupting your plants’ ability to get what they need on their own, thus creating much less work for you, and a healthier environment for your plants.
10 Healthy Herbs You Can Grow in Water
No garden? No Problem! You can grow your own indoor herb garden without a pinch of soil. Even if you live in an apartment with nothing more than a tiny back porch or balcony, there is still room to grow some fragrant herbs. All you need is water, sunlight, and a place for your plants to spread their roots.Sweet Herbs
1. Peppermint
With fresh Peppermint leaves, you’ll find that it’s quite simple to make essential Peppermint Oil. This oil can be used to relieve headaches, reduce stomachaches, alleviate digestive issues, boost energy, and release tight muscles. Every family should have a peppermint plant in their home.2. Mint
Mojito season is just around the corner! There is nothing like freshly picked mint to make the perfect cocktail to entertain your friends or take the edge off after a long day. Adding some mint into water is an easy way to switch your kids off of sugar drinks and get them to hydrate!3. Stevia
Just as you would with crystalized Stevia that comes in a packet, you can add whole Stevia leaves to sweeten your tea or pitcher of ice water. Alternatively, you can dry the Stevia leaves and grind them with a mortar and pestle, which you can then simmer in water to make Stevia Syrup.Savory Herbs
4. Oregano
Pasta sauces, Greek Vinaigrette, Lemon Oregano Dipping Sauce, Garlic and Oregano Chicken Marinade–the list goes on and on. Oregano is the king of the herbs when it comes to sauces and marinades; you can put that stuff on everything.5. Rosemary
In my house, we use our Rosemary plant to make Rosemary Oil. We add this oil to dough for pizza and bread to give them an artisan flavor, to pasta for a balanced Italian flavor, and even to our bath water to give us extra soft skin.6. Basil
It’s all about the Pesto, baby. Once your Basil plant has an abundance of leaves, pull them off and puree them up with a little bit of olive oil, garlic, pine nuts, parmesan, and some salt and pepper to taste. You have just made organic Pesto from scratch. Congrats!7. Thyme
Thyme is a key ingredient in Italian cooking. If your family loves lasagnas, soups, stews, or any pasta dish in general, you are certainly going to get tons of use out of a Thyme plant growing on your windowsill.8. Tarragon
Tarragon goes well with any protein: fish, chicken, lamb, rabbit, etc. Often used in French cooking, expect a subtle licorice flavor that will turn any normal cooking night at your house into a gourmet dining experience.9. Sage
The ancient art of burning sage to purify your house of bad energy and cleanse it of evil spirits sure is reason enough to grow it. Or if you’re an Omelette fan who likes to add a pinch of sage to brighten up your breakfast, I suppose that’s a good use, too.Bonus Herb
10. Lemon Balm
Lemon Balm is more so used as a medicinal herb, rather than a yummy one. It can be used as an anti-histamine when rubbed on bug bites or irritated skin, crushed up and mixed into lip balm to sooth cold sores, chewed on for clean breath, and much more.How to Grow Your Herbs in Water
Step 1: Grab a Jar, Drinking Glass, or Small Jug
This is going to be your container for your water herbs. You want your container to be about the same height as a light bulb so that your herbs don’t get swallowed up. Fill your container half way with water.Step 2: Collect some Herb Clippings
Whether you buy herbs from the store or snip some off of an existing plant, make sure that you have a stem that is long enough to stand half-exposed in the jar. If you are snipping these herbs from a live plant, allow the trimmed herbs to sit out for a day in a cool area.Step 3: Plant ‘em
Place your trimmings into their containers and set them in a window that receives a couple hours of sunlight every day. Within a week or so, you’ll see your herbs starting to grow longer and stronger roots while the leaves become fuller.Step 4: Eat or Grow
Pluck your herbs right out of their water container to chop and enjoy or replant them in a pot of soil where they will bloom even further.Tips:
- Pluck leaves from the top of the plant so the bottom and side leaves have a chance to grow.
- Use a spray bottle to keep the leaves moist so that they don’t develop holes.
- Spray Citrus Oil to keep away ants and Eucalyptus Oil to ward off flies and bees.
- 16oz Mason Jars are the perfect height and width to grow your herbs in water.
- Change the herb water periodically or if it starts to look a little murky.
10 Ways To Save Money Raising Chickens

Not $0.65 a dozen. $0.65 for each. darned. egg.
I learned a few very valuable lessons that first year. Mostly, the importance of keeping good records of expenses vs. production on a homestead. You must know how much something is costing you in order to make good money decisions moving forward. Otherwise this homesteading thing could very well outgrow your budget.
You’d think simple living would automatically save you money.
Not so, my friend. Not so.
Over the past few years we’ve had to do a lot of tweaking and experimenting to bring our production expenses down. Raising chickens has been a costly endeavor. If we could go back eight years and apply what we know now to our flock management, we could have saved a ton of money.
Unfortunately, there’s no going back.
The good news is I can at least share what we’ve learned with you so that you don’t have to make the same mistakes we did.
So friends, here’s my advice.
10 Ways To Save Money Raising Chickens

1. Free range your flock as much as possible, as safely as possible.
In the beginning we got the free ranging thing right. We let our hens roam our entire property, allowing them to scratch and forage to their heart’s content. The great thing about free ranging your flock is that they are able to get a more natural diet, making the chickens and their eggs healthier, while also cutting down on your feed costs.
Quite unfortunately, however, predators abound. It wasn’t long before we had all kinds of drama with neighbor’s dogs killing our chickens. This happened on way too many occasions. And of course there were foxes, opossums, weasels, baby chick eating snakes, and hawks. Even our own dogs killed a few of our hens, for goodness sake.
We quickly realized that there was no safe way to completely free range our flock without a chance of them being eaten. We had to fence them in somehow. The loss of a full grown hen will set you back $10-$20 per bird, depending on what you’ve invested in them. To walk out of your house and discover a dozen mangled bodies littering your yard is not only heart breaking, it’s a hit to the wallet as well.
Something to keep in mind. Free ranging doesn’t have to mean ‘completely free to roam wherever they want all the time’. You might not want chicken poop on your front porch. That’s okay. Redefine what free range looks like to you. It might turn out that free ranging means allowing your hens to freely forage within a certain fenced in area. Cool. Do what works best for you.
My suggestion would be to fence in as much of an area as possible (yard or woods, or both) to allow your chickens foraging space. They absolutely love digging in leaves and soft dirt where bugs can easily be found, if you have such a place for them.
Wire fencing from a farm supply store is the least expensive fencing option we’ve found. I would not recommend chicken wire, it’s a stinking pain to deal with. The holes in the fence just need to be big enough that a fox can’t get in and full grown hens can’t get out. Baby chicks will still be able to scoot through larger holes, but mama hens are very good about calling them back in to stay close. If you’re raising chicks without a mother you might make a small chicken tractor to move them around in (in this case using chicken wire so they can’t get through) until they’re big enough to stay in a larger fenced in area without escaping.
Of course, if you live out in the open prairie with no woods and no houses for miles and miles, you might only need to worry about providing shelter for the chickens to hide under when predatory birds fly over. Adapt this advice to your particular situation.
If you have absolutely nowhere to free range your birds other than perhaps a small chicken run, consider building a raised bed within the run and planting it with grass or clover. Put wire over the top of the bed so the chickens can’t scratch it all up. This will allow the plants to grow and the chickens will be able to enjoy the fresh greens growing through the wire on top. You could also plant blackberries, raspberries, or grapes to climb the chicken’s fencing, creating a beautiful cover of shade during the hot months and also providing forage when the berries drop.
Free ranging your flock (or providing forage) will definitely save you a lot of money in feed. Just make sure you protect your chickens from predators to avoid unnecessary, costly losses.

2. Feed your flock lots of scraps.
Chickens can eat all sorts of leftovers from your table as well as garden scraps. This is another really great way to supplement your feed costs.
Take a look at the list I posted on What Chickens Can Eat, and What They Can’t to see what’s okay to feed from your leftovers and what should be avoided. By the way… chickens can eat cooked chicken. I know that sounds wrong on so many levels, but it’s true. They’re total cannibals.
Make a bowl for leftover foods to be scraped into throughout the day, and toss them to the chickens before dark. If you aren’t shy about it, start a scrap food bowl at the next potluck you attend. (I totally do this every Thanksgiving!) When you’re working in the garden pulling up weeds or disposing of rotten produce, toss those to the chickens as well. They’ll love it.
Stop throwing leftover food and garden scraps away and turn them into free chicken feed.

3. Collect bugs for your hens.
Bugs provide excellent protein for laying hens, which is necessary for good egg production.
Every June we’re plagued with swarms of Japanese Beetles and June Bugs. So far the best method I’ve found for controlling the damage they do to our roses and grape vines is to hand pick them off one at a time. We hold a bucket of water underneath one of the beetles, and then touch the bug to make it drop down into the container. Once we have a large collection of desperately swimming critters, we dump them out onto the ground in the chicken run where the hens go crazy in a feeding frenzy.
We also throw any grubs we find into the chicken run. If we can catch the beetles in the grub stage when turning over the garden it helps mitigate the damage done when they reach the adult/mating stage.
If there are certain pests that abound in your area, try catching them and feeding them to your hens. Watch to make sure the hens will actually eat them before you offer a bunch. Believe it or not, there are actually bugs that chickens won’t eat. And please don’t feed them stinging caterpillars. I did that once and instantly regretted it. The chicken lived, but it didn’t look like it was pleasant going down.
Another way to bring protein directly to your hens is to place a wooden board or a large piece of cardboard on the ground in the chicken run and leave it there for several weeks through a few good rains. Over time lots of decomposing bugs and earthworms will come up under the surface of the board to begin their work of breaking it down. Call your hens over to the board and turn it over quickly. You should see a plethora of cockroaches, pill bugs (roly polies), worms, maybe a few crickets, and who knows what else. Your hens will enjoy a free, nutritious meal. Put the board back down and repeat the process.
You might also try growing black soldier fly larva.
Toss garden pests to your hens and everyone benefits. Except for the unfortunate bugs, of course. They get reincarnated into eggs.

4. Eat eggs like the pioneers.
For the longest time I was baffled by how the pioneers were able to feed their chickens without driving down to the local farm and feed store to buy laying mash. What the heck did they feed their chickens so they’d consistently lay?? I searched everywhere for this secret homemade laying mash recipe. I did find a few (modern) recipes. But none that I could apply practically (or cheaply!) on my homestead.
And then I read something somewhere that was a revelation to me.
The pioneers ate seasonably. Not just in produce, but in animal by-products as well.
They didn’t force their hens to lay at top production year-round. They simply let them forage, fed them scraps, and occasionally tossed them some dried corn- and collected whatever eggs resulted. They didn’t try to get a dozen eggs a day out of a dozen hens. They just ate what they got. Likely they had an abundance during late spring and throughout the summer months, and very little throughout late fall and wintertime. If they were lucky they might have a supply of stored eggs to rely on during the slow months.
If you want to raise laying hens on the cheap you’re gonna have to reign back your expectations and be happy with what you get. If you want eggs every day from every hen you own, it’s gonna cost you. Probably more than what you could buy them for at the store.

5. Don’t invest a lot of money in your setup.
Honestly, chickens will be happy with a simple roof over their heads. I know it can be tempting to buy a super cute Amish built coop, or construct a fancy enclosure like the one you saw on Pinterest. But there really is no need to break the bank in order to house your flock. Try not to get swept up in impressing people, and keep it cheap. You can easily build a chicken coop for free using scrap materials if you’re resourceful and creative.
Our first chicken “coop” was a large rabbit hutch we got for free from Craigslist. Our current coop was built out of pallets and scrap materials we picked up over time. Keep an eye out for old windows and doors, used metal roofing, and scrap lumber.
Design your coop around the materials you have instead of buying materials to fit the design you want.
The interior of the coop can just as easily be built from scrap materials. Nesting boxes can be made from scrap wood, buckets, crates, bins, and old drawers. Roosts can be made of branches collected from nearby trees. Bedding can be composed of dry grass clippings, leaves, wood chips, old hay… stuff you find naturally and for free.
There’s absolutely no reason you’d have to spend a bunch of money outfitting your coop.

6. Butcher on time.
This has been a big one for us. We’ve wasted a ton of money feeding a flock of meat birds for months and months past their recommended butchering age because, honestly, we were not looking forward to the butchering process. There was always something else we’d rather get done.
But every week we kept them alive was more money down the drain. Those chickens ended up costing us more per bird in feed than what it would have cost us to purchase whole organic chickens from the grocery store. Especially since we were buying organic, non-gmo feed. Not such a great deal to raise our own meat after all.
Procrastination is going to cost you.

7. Cull old laying hens.
There will come a time when your hens are no longer producing well (typically after 2 years of laying), and you’ll need to cull them out in order to make the most of the resources you’re providing. The longer you keep your hens the more they’re going to cost you overall.
Unless you just want to keep your hens for pets and don’t really care about the cost/return aspect, at some point you’ll have to cull the older hens to make way for new, younger layers. This could mean you put old hens in a stew, or if you can’t handle that you can give them away. There’s no shame in not wanting to butcher. We’ve given plenty of chickens away because we didn’t want to/have time to butcher them. Or if you don’t care if they’re butchered but you don’t want to do it yourself, you can always sell them for a few bucks to somebody who doesn’t mind doing the work.
It’s good practice to rotate your flock each year so that you always have new layers coming in and old ones going out. This will ensure that your expenses are matched by production. You may even have an excess of eggs/meat that you can sell to help offset your feed costs.
Bottom line. Old hens will end up costing more than they can return. Good flock management is key to staying in the green.

8. You only need one fella.
Whether you order a straight run of mail order chicks or you hatch them out at home, inevitably you’re going to end up with more than one rooster at some point in your homesteading career.
If you have more than one rooster you have one money-wise decision to make. Get rid of it. You can raise it until it’s big enough to butcher and put it in a pot. You can list it for free on Craigslist and let somebody else figure out what to do with it. Or you can take it to an auction and sell it. Eventually the roosters will fight each other to the death anyways (even through a fence!), which is just sad and unnecessary. The sooner you make a decision the better.
There’s only one reason you would want to keep more than one rooster, and that’s if you’re a breeder who needs to keep the lines pure. In this case you’ll keep the roosters far away from each other so no fighting will occur.
You might consider introducing a new rooster to your flock every few years in order to keep the gene pool fresh if you’re hatching your own chicks. Inbreeding is generally okay with chickens, but I’m not sure how that will affect your flock through several generations.
Remember, every day that you feed an extra mouth that isn’t producing something of value for your homestead is money going down the drain.

9. Hatch chicks naturally.
If you really want to have as little money invested in your flock as possible, you’ll want to hatch chicks naturally rather than buying them year after year. Even hatching chicks in an incubator is an investment of both dollars and time. The absolute easiest and cheapest way to increase your flock (or to rotate in fresh layers) is to allow a broody hen to raise them for you.
Some breeds are better than others for going broody. We’ve had good luck with Black Giants, Orpingtons, and Silkies. Do some research before selecting the breed of chickens you’d like to go with. Are they known for going broody?
Not only will it save you money to let a hen sit on a clutch of eggs to hatch, you’ll also have much heartier and healthier chicks than if you were to order them from a hatchery. Mother hens have a knack for teaching their babies how to scratch and forage as soon as they leave the nest (at about three days old), so the chicks learn very early on how to find important food.
We’ve noticed that our mail order chicks take much, much longer to learn to forage. They’re even leery of eating scraps thrown to them because they just aren’t sure what’s okay to eat and what isn’t (until the bravest/most curious of the group steps up and takes the first experimental bite). Alternatively, mother hens cluck with delight when they find something yummy for their babies to eat, and the little ones quickly flock to her side to taste what she’s found for them.
10. Raise chickens without buying grain at all.
This is a pretty fascinating concept that I’d love to implement on my own homestead. Basically these farmers began collecting manure, food waste, and garden leftovers and built compost piles to free range their chickens on exclusively. The chickens have thrived on this diet and the farmers have enjoyed even better eggs and meat from their flocks.
20 Plants You Can Turn Into Flour
ByIn most of the world, wheat is a staple of almost everyone’s diet. Bread, pasta, cakes, cookies, cereal, and even beer all have wheat in them. Because of this, many off gridders are trying to grow their own wheat, but unfortunately, wheat can be difficult to grow depending on the land and climate.
1. Almonds – Depending on your location, almonds can be trickier to grow than many other options. They require a warm climate, bountiful water, and take quite awhile to reach maturity and produce. Still, they’re a favorite for those looking to eat more gluten free and raw foods. They’re full of protein and healthy fats and fairly easy to process into flour.
2. Oats – Growing oats is surprisingly easy and they are one of the few grains that can withstand rather cold climates. Today there are also hull-less varieties which produce less but have a clear advantage in processing time. Oat flour is also relatively high in protein and fiber.
3. Cattails – Cattails are awesome for a lot of reasons but many people love them for their high protein pollen which can be easily harvested and used just like flour. All you have to do is shake the pollen off into a bag and it makes excellent yellow pancakes. Cattails are also typically very easy to find, though it’s important to note that they’re bioaccumulators, so they take up environmental toxins. Avoid harvesting cattails in polluted or sprayed areas.
4. Acorns – Acorns may be touted as an emergency survival food, but they make a surprisingly delicious flour for everyday use. They’re easy to recognize and forage, plus they’re abundant in many forests. However, they do take a while to process. Because of their high tannin content, acorns must be leached in water before they can be eaten. It may be worth the trouble, though, for their good flavor and abundance of protein and healthy fats.
5. Coconuts – Growing coconuts is only practical in a warm climate, but if you don’t live in a warm climate and really want coconut flour, you can still make it using unsweetened coconut flakes which are very affordable. Coconut flour is generally made from the pulp leftover from making coconut milk, giving you two useful products. It’s high in fiber and many micronutrients.
6. Rice – Rice flour is becoming more popular at stores with the rise of gluten-free diets, but it’s also easy to make from home. Rice can be purchased in bulk, grown at home, or wild harvested and then ground. Unfortunately, wild rice, which used to be abundant throughout the eastern U.S., is now limited to the great lakes region and remote areas of New England because of habitat loss. However, rice is surprisingly easy to grow at home even if you live in a northern climate. And contrary to popular belief, rice does not need to be flooded.
7. Amaranth – This is one of the easiest to grow. Amaranth is heat and drought resistant and grows so well it’s often thought of as a weed. In fact, many people actually call wild varieties pigweed. It’s high in protein and was bred and grown for flour by the Inca and Aztec people of south America. Like many other grains, it does need to be winnowed to remove any chaff (plant material & hulls) after harvesting.
8. Sorghum – Sorghum is mostly well-known for molasses production, but there’s also varieties that have high grain production. It’s much like growing corn and does well in hot, dry climates. Unlike corn, however, the seeds have to be processed and winnowed. Sorghum flour is surprisingly healthy and offers plenty of protein, iron, B vitamins, and fiber.
9. Buckwheat – Though not related to wheat, buckwheat still makes a tasty flour. It’s also one of the fastest growing grains and grows so fast it will smother weeds. It does well in extremely poor soil and is loved by honeybees and other pollinators. It does require threshing and winnowing, just like wheat. Nutritionally, buckwheat is high in protein and great for hungry homesteaders.
10. Rye – Growing rye is very much like growing wheat, which is easier than you’d think. As with many grains, the tough part is harvesting and processing if you don’t have the equipment to do it with. It is more nutrient dense than many modern wheat varieties though.
11. Spelt – Spelt is actually just a sub-species of the common hard red winter wheat. It’s not too difficult to grow, though you’ll spend quite a bit of time threshing and winnowing the grain. Spelt is high in nutrients, but if you’re looking for a gluten free option, it only has slightly less gluten than wheat.
12. Plantain – While the name plantain may evoke images of a fried starchy banana plantain, is also a common weed. In the U.S. both broadleaf and narrow leaf plantain are fairly common in lawns, gardens, and fields. Their leaves are often used in herbal remedies, but they also grow long stalks covered with seeds which can easily be collected and ground into flour. While they’re easy to harvest, the seeds are small so you’ll need a fairly large patch.
14. Millet – Millet has long been a staple crop and is notorious for its ability to withstand drought conditions. It’s easy to grow but does require threshing and winnowing. Millet is high in protein and magnesium, and it acts as a prebiotic, feeding gut flora. It’s also gluten free.
15. Flint/Dent Corn – Today we don’t think of cornmeal as a flour, but it can be an excellent substitute. Flint and dent varieties of corn often thrive where wheat struggles and some are extremely drought resistant. They’re also easier to harvest and process than many other grains, though their flour doesn’t offer the protein that many seed and nut flours do.
16. Chestnuts – Despite the devastating loss of American chestnuts in eastern forests, you can still forage or grow chestnuts. You may find or plant sweet chestnuts, Chinese chestnuts, or Chinese-American hybrids which are being reintroduced. While chestnuts are easy to grow, forage, and harvest they can be difficult to peel but they do make an excellent high protein flour.
17. Soy – While soy often gets a bad rap, it’s actually very healthy. Soybeans are easy to grow, and growing your own allows you to choose heirloom varieties over “round-up ready” strains. They’re actually nitrogen fixing legumes perfect for adding fertility to your garden. Soy flour is high in protein and relatively easy to make.
18. Quinoa – Quinoa is the cool weather loving cousin of amaranth. Just like amaranth, it’s very easy to grow and offers a good high protein flour.
19. Crabgrass – Many people think crabgrass is an annoying species to be exterminated, but at one time it was actually a prized, cultivated grain. Its seeds can be easily harvested and ground into flour which is high in protein.
20. Chickpea – Also called garbanzo beans, chickpeas are another easy to grow nitrogen-fixing legumes. They’re quite productive and easy to make flour from, but prefer warm climates. Chickpea flour is a good source of vitamin B6, folate, magnesium, iron, and protein.
This list is by no means comprehensive but should provide you some ideas about how to live on a diet right from the land. It’s absolutely possible to make healthy, tasty flours without growing acres of wheat.
How to Handle Toothaches Post Collapse

So I feel I can tell you of some home remedies worked honestly by experience, as I scoured the internet and asked anyone I could for home remedies and old wives tales, secrets, etc. Even through pain meds and all the OTC pills and store products, it was the home remedies and natural cures that worked the best. I had some mishaps and a few I overdid and I will list those as well, as with any natural substance you have to use care when using it. I actually worked in orthodontic restorations for a decade, not bridges, but making veneers and caps, and specialty items like vampire teeth, “grills”, and overlays with gold and gemstones.
One thing that is for sure, you will still have teeth after SHTF or post collapse. Most will have thought of tooth brushes and toothpaste for their stockpiles, and oral care may not be the first thought when prepping for SHTF. But a simple abscess can kill a person very quickly. So it’s smart to not only think about routine dental care and maintenance, but to educate yourself and prepare for any dental emergencies in a time that dentists may not be readily available. Hopefully you will not to need to know for a long time. These remedies can be good to barter with and help the poor soul who may be suffering from tooth and jaw pain. Being proactive now, and stocking up can sure help you in the long run.
Stone Age Cavity Repair
An interesting article is this piece on finding a beeswax cap making a cavity filling on a Neolithic body that is over 65,000 years old. Another find was the use of flint drills on teeth from bodies in a 9,000 old Pakistan grave.What is a Toothache?
Commonly called odontalgia, a toothache is one of the worst pains imaginable. It is considered a pain in, or around, the tooth and its gum that can go into the jaw and it can be quite severe. It generally is described as a “pulsating” pain.There are a few different ways this pain can be generated, and you will want to identify the cause as well as you can to be able to treat it. There are a few conditions that can cause pain in the area that are not related to teeth (like referred pain of a myocardial infarction, chemotherapy neuropathy or TMJ that affects the trigeminal nerve), but in this article we are talking about toothache and jaw pain.
Conditions that cause toothaches and tooth pain:
- Poor oral hygiene, although cavities are the most common reason. Bacteria east through the enamel.
- Wisdom teeth
- Cracked teeth
- Dry sockets left after extraction
- Jaw pain
- Broken tooth
- Filling falling out
- Abscess
- Swollen jaw, usually from an abscess
- Teething in younger children
- Injury, bleeding can be stopped. If the tooth is chipped or lost, care will be needed.
A few things you can do to the alleviate pain, or at least not make it worse, are:
- Stick to lukewarm temperatures a crack or break in the tooth exposes the tender nerve inside, and any extreme temperatures can cause pain and aggravate the situation.
- Carefully floss and rinse around the area you will want to remove any particles that may put pressure on the tissue, and avoid anything from getting into the exposed site. Rinse the mouth with a salt water rinse for the same reason. The saltwater will help wash away blood and any infection or drainage.
- Elevate your head having your head elevated is the preferred method, as is you lower it below heart level it can cause your heart to work harder to push blood, increasing pressure and intensifying pain signals and throbbing.
- Avoid high sugar and high acid foods as they can stimulate the nerve, and intensify the pain.
- Try OTC pain medications use the ones that are anti-inflammatory, to help keep the swelling at a minimum.
- Cold compresses with ice on the outside of your face. Reflexologists swear icing your hand will quell any signals to the brain, place ice between the thumb and forefinger.
- Make a plug from gauze, gum or beeswax to fill a hole or seal the crack (see below).
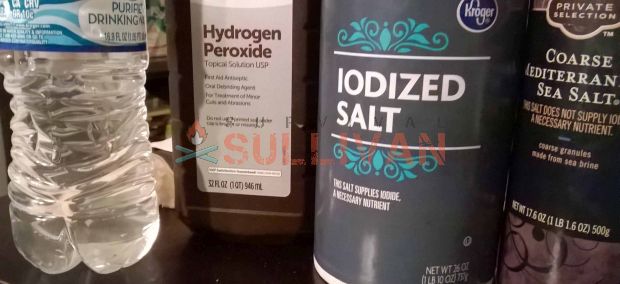
Rinses to desensitize the mouth, kill bacteria, and help fight infection
- Salt water– use 1/3 cup to 1 glass of hot water. Dissolve and use when warm. 30 seconds rinses several times a day.
- Salt water mixed with 3% hydrogen peroxide, some add essential oils such as peppermint or cinnamon. Check our article on essential oils to help pick ones that may help, disinfect, and lessen pain, depending on your immediate needs.
- Black tea is known for its soothing and inflammatory qualities. The tannic acids will help sooth burning and inflamed tissues.
- Peppermint tea peppermint is a known headache and numbing remedy, so use leaves in hot water and make an astringent rinse. A wet tea bag against the tooth can help also.
- 1/2 Maalox liquid and ½ liquid Benadryl may help by coating and numbing, do not swallow.
- Hydrogen peroxide to kill bacteria, wash away infection and squash any growth of microbes, use 3% solution as a rinse. Infection can be signaled by a metallic taste in the mouth and accompanying fever. Rinse well with water after use.
- Guava leaves use their leaves to make a thick concoction by steeping for 20 minutes, rinse the mouth and in about a minute you should feel some relief as to the high concentration of analgesic properties.
- Myrrh a natural astringent, myrrh may have been a gift to the baby Jesus to help with teething, just joking but it was considered a treasured substance for its medicinal properties and it’s easy to grow.
Soak
Black pepper and vinegar pack soak One country cure is on the outside of the cheek, use a vinegar soaked piece of brown paper bag and fill one side with loose black pepper and apply that side to the cheek. I made a pocket with the pepper inside and lay my head on it. It is a warming sensation that was quite soothing. I do know this is an old remedy for a homemade liniment, before the days of Bengay and Icy Hot or portable heating pads, for athletes. Especially horse ones, as this was a backfield fix to sooth swollen legs post-race. I live in Kentucky, believe me on this. So this makes sense it would be a warming, soothing compress for tooth pain.Topical Applications to Help Toothaches
The following can be applied in a paste (use a Q-tip for better aim), inside a filtering device such as a coffee filter, tea bag, or stocking piece as a poultice to allow it to soak in and only affect that area, or as a rub. They can also be placed onto a cotton ball and placed between the cheek and gum, or the bite can hold them in place.
- Most Effective Toothache pain remedy I tried:
- Salt & black pepper paste this 50/50 salt and pepper paste was a cure I heard from Eric’s mother from her great grandmother. I thought it so simple. There was no way it would work, right? After it did wonders, like a switch to the pain suddenly turned to “off.” I am now a believer.

- Wheatgrass can be chewed or used as a rinse as it is a natural antibiotic. It also draws out heat and toxins, so helps relief pain from swelling.
- Asafetida this is an ancient Indian cure, its name literally means “stank resin”. Use a pestle and mortar to mix it with lemon juice. Then heat to make a lotion for quick pain relief. It had the same effect as Oragel for me, and about 90% cheaper. It’s very cost effective. It has a smooth taste, but stinks like hell. Do not store around other foods, only in sealed plastic containers. It is also a digestion aid and fights flu and the H1N1 virus as its antiviral. This is another you may want to plant for trade and barter as it is good for asthma, bronchitis, whooping cough, and epilepsy. The Dutch colonists wore it around their neck in small bags.
- Garlic this has a very strong antibiotic effect, and also allicin to slow down microbe growth. Crush and apply. Many recommend a daily garlic clove for improved oral health and to fight early stages of gingivitis, which may apply in a solitary way of life. The smell is strong. No vampires attacked.
- Onion the studies have shown the highly concentrated antibacterial properties of onions, they saw eat them raw daily or chew for 3-5 minutes to kill all the germs in your mouth. I can see this in a SHTF use, plus they are easy to grow and dry. Place a slice of onion over the tooth that is affected. If the toothache is ongoing, such as with wisdom teeth coming in, eating onions daily will boost immunity and improve overall tooth and gum health.
- Aspirin this one was very effective with a broken tooth I had. When my wisdom teeth came in, a few teeth had fillings that came out, leaving open “pits” over the nerves. Well, it was horrible. The aspirin worked by scalding the nerve and deadening it. I made the mistake of getting it on my gums, it left white chemical burns as I had used it overnight. It was effective in deadening horrible pain inside a tooth, as it was hard to get to. But use with caution. It works, but it will numb your lips and tongue and anything it touches. I powdered it, and just used my finger to pack it in the filling cavity.
- Ginger crush and apply, see below

- Cayenne pepper make a paste and apply with a Q-tip, see below
- Cayenne and ginger paste both ingredients are potent painkillers and block pain signals from entering the brain basically by burning the area, and causing that “fight or flight” to set in and increase endorphins and serotonin to the “traumatized area”. This is the science with “hot” applications. Place on a cotton ball and when the pain fades, remove.
- Lime helps with bleeding gums and by adding vitamin C. It is also smart to use it when you have a decaying tooth and loose teeth. Grind the peel and add it directly to gums and eating raw lime will heighten your vitamin C concentrations.
- Tea The tannins in many teas are very soothing and act as an antiseptic. Use them in their tea bags to soak the area for relief. Make combos with salt, pepper, olive oil, clove oil, garlic for added benefits.
- Bay berry this little berry has antiseptic, antibiotic, and antipyretic properties so it helps stop the toothache and strengthen teeth while toning gums. Use the bark with vinegar to make a paste to apply directly to the painful tooth.
- Oil of oregano swabbed on is an antiseptic and antimicrobial.

- Clove powder the eugenol in clove powder is a powerful anesthetic and it also has antiseptic properties. It is said to mix this with vanilla as vanilla enhances chemical properties. I did find some relief with this, it numbed the tooth.
Quick fixes to plug a cavity, seal a crack, or cover the nerve
These are meant to be temporary, but covering the area whether it is a crack or actual hole, can really go a long way to bringing pain levels down and protecting the area. The last thing you want to do is get food or particles in there that develop into a major infection. So I would rinse well and clean it the best you can. If you have a loose filling or tooth, these may help by offering some steadiness.- Chewing gum
- Beeswax or candle wax
- Epoxy
- Wood (many pirates had wooden teeth crowns)
- Resins
- Anything that can seal it
- Rubber cement
- I used a spackle type of repair kit
Preventative Measures to Incorporate
Hindsight is always 20/20, isn’t it? There are a few things that may be worth incorporating into your life now, which can help to avoid future dental pain or work. If we are in a world where you do not know if you will be able to see a dentist, these can be very important as tools to avoid painful and maybe life threatening conditions.I never want to go through that pain I had when I couldn’t see a dentist over the holiday. I won’t add procrastination to the list, but these things do not improve. So maintaining your teeth with checkups and good oral hygiene practices is the best way to prevent, or push away, any extra trips to the dentist.
- Use a toothpaste and water that is fluoridated
It is actually in many foods (for a list of the 524 foods highest in fluoride check here), so in a post collapse situation you can still get that advantage in oral health from fluoride from foods like:
- Pickles
- grapes and raisins
- Grape juice
- Orange juice
- Grapefruit juice
- Apple juice
- Spinach
- Tomato products
- Carrots
- Potatoes
- Peaches
- Pears
- Farina
- Oats
- Many baby foods
- Asparagus
- Popcorn
- potato chips
- Prevent impacts
- Limit sugars or brush more to level it out
The Egyptians used this as a source of tooth care, but it doesn’t take care of the junctures in between, as evidenced by the dental records of the thousands of mummies examined. The primary cause of their periodontal diseases was bacterial irritation in the accumulation of plague at the dentogingival junctions- gum lines. The main thing they noticed about the teeth, in all levels of society, was how ground down the teeth were from the sand in everything!
- Avoid alcohol, smoking, tobacco?
- Maintain a healthy diet, or try to eat healthier

Pat Henry, (theprepperjournal.com) "Why Prep?"